
Office Remodel
When we first started house hunting back in 2015 for our second home we were pregnant with Duncan and looking for a home with a lot more space. We were coming from a beautiful older home in Sammamish with a giant unruly yard and a very outdated aesthetic. Move-in-ready was a must for us since neither of us really had the desire to do crazy house projects on top of taking care of our young children. We fell in love with this house as soon as we walked through it and were lucky enough to be some of the only buyers in the market during Christmas (previous seller fell out of escrow and the owners had already moved out!!).
The basement bedroom was initially my craft room. I had my Etsy shop up and running and it was amazing to have a dedicated space for it. Eventually I slowed down on the Etsy shop and the room was seeing less and less use so we converted it to the guest room (we also needed the upstairs spare bedroom to be a nursery for Archer). Since the guest room is really only used twice a year, we rarely checked the space. I can’t remember why I was in the basement bedroom but when I saw the bowing baseboard I knew something was definitely not right. (Apologies in advance for most of these being crummy iPhone instagram stories screenshots!)

After calling my dad and Dave and running outside to make sure there wasn’t a hole in the side of the house, we started tearing into the wall. Turns out the hose had burst a pipe over the winter and when we had been draining (and then refilling) the hot tub, it had strained the pipe enough to cause decent water damage.


Thankfully it seemed like it was a one time event and not a long term (over the course of multiple years) issue. The mold was not bad and we were able to easily remove the damaged insulation and scrub the moldy boards down. New insulation and drywall were a pretty quick project. Ripping up carpet was also incredibly easy. We used a scraper to scrap up the old glue and x-acto knife to cut the carpet up. So easy!

The real problem was that neither of us are necessarily talented at drywall patching and texturing…so Dave suggested we just shiplap the whole room to hide the patch job. At this point Dave had also convinced me that we should convert this room into a dream office/craft room. I was worried about losing the dedicated guest room with adjacent full bath, but Dave insisted that this would be the best use of the space, since we only have house guests 1-2 times a year. So we moved the guest room furniture into what had previously been the main floor office, and dove headfirst into the most intense home remodel project we’ve attempted yet.

Shiplap! This was an insane amount of work. Shiplap is no joke. We bought real shiplap from Home Depot instead of doing the plywood hack. It was more expensive, but the quality is great and it was much easier to work with. Pre-primed meant we didn’t have to paint before hanging (although I did use a magic eraser on orange scuffs from the warehouse). The best decisions we made however were buying a few items:
Festool Plunge Cut Track Saw & Tracks
Shop Vac (which we realized could be connected to the festool)
We would cut boards about an inch long and then fit and cut each individual board as we moved our way down the wall. The festool was huge in making straight, clean cuts, especially lengthwise along the bottom of the shiplap. After hanging the shiplap we would set the nails and then fill them. Once the fill was dried they were sanded completely down. The same fill and sanding process was done in all the corner seams which made a huge difference in making the project look “finished”. The plastic wood fill was absolutely amazing and worked super well.

Best part about completely ripping the room apart: it was super easy to prep the room to paint. Also this paint jumpsuit was clutch. We use Alabaster from Sherwin Williams. Absolutely love this white. We’ve done Shoji throughout the majority of the house, which is a lot warmer (pink undertones). A word of caution; white paint tends to not do well in poorly lit rooms. Although this is a basement room it has a giant window so it looks great. The main room of the basement however we will be painting a color since it has almost no natural light and as a result the white walls feel incredibly dingy in there.

With the outlets back on the wall, the room felt a lot safer for the kids. Braden was super excited to help Dave do the flooring. It’s a floating floor that has the pad build into the bottom of the blanks. He knocked it all out in one day. He sliced his finger pretty badly just handling the planks when opening the boxes, so please wear gloves. They come with robust instructions and were a very straightforward installation. However they were exhausting. It was a lot of effort to cut them (x-acto knife with square), and then synching them up with the mallet. The closet at the end was especially challenging. The floors are Lifeproof Floors in Fresh Oak.


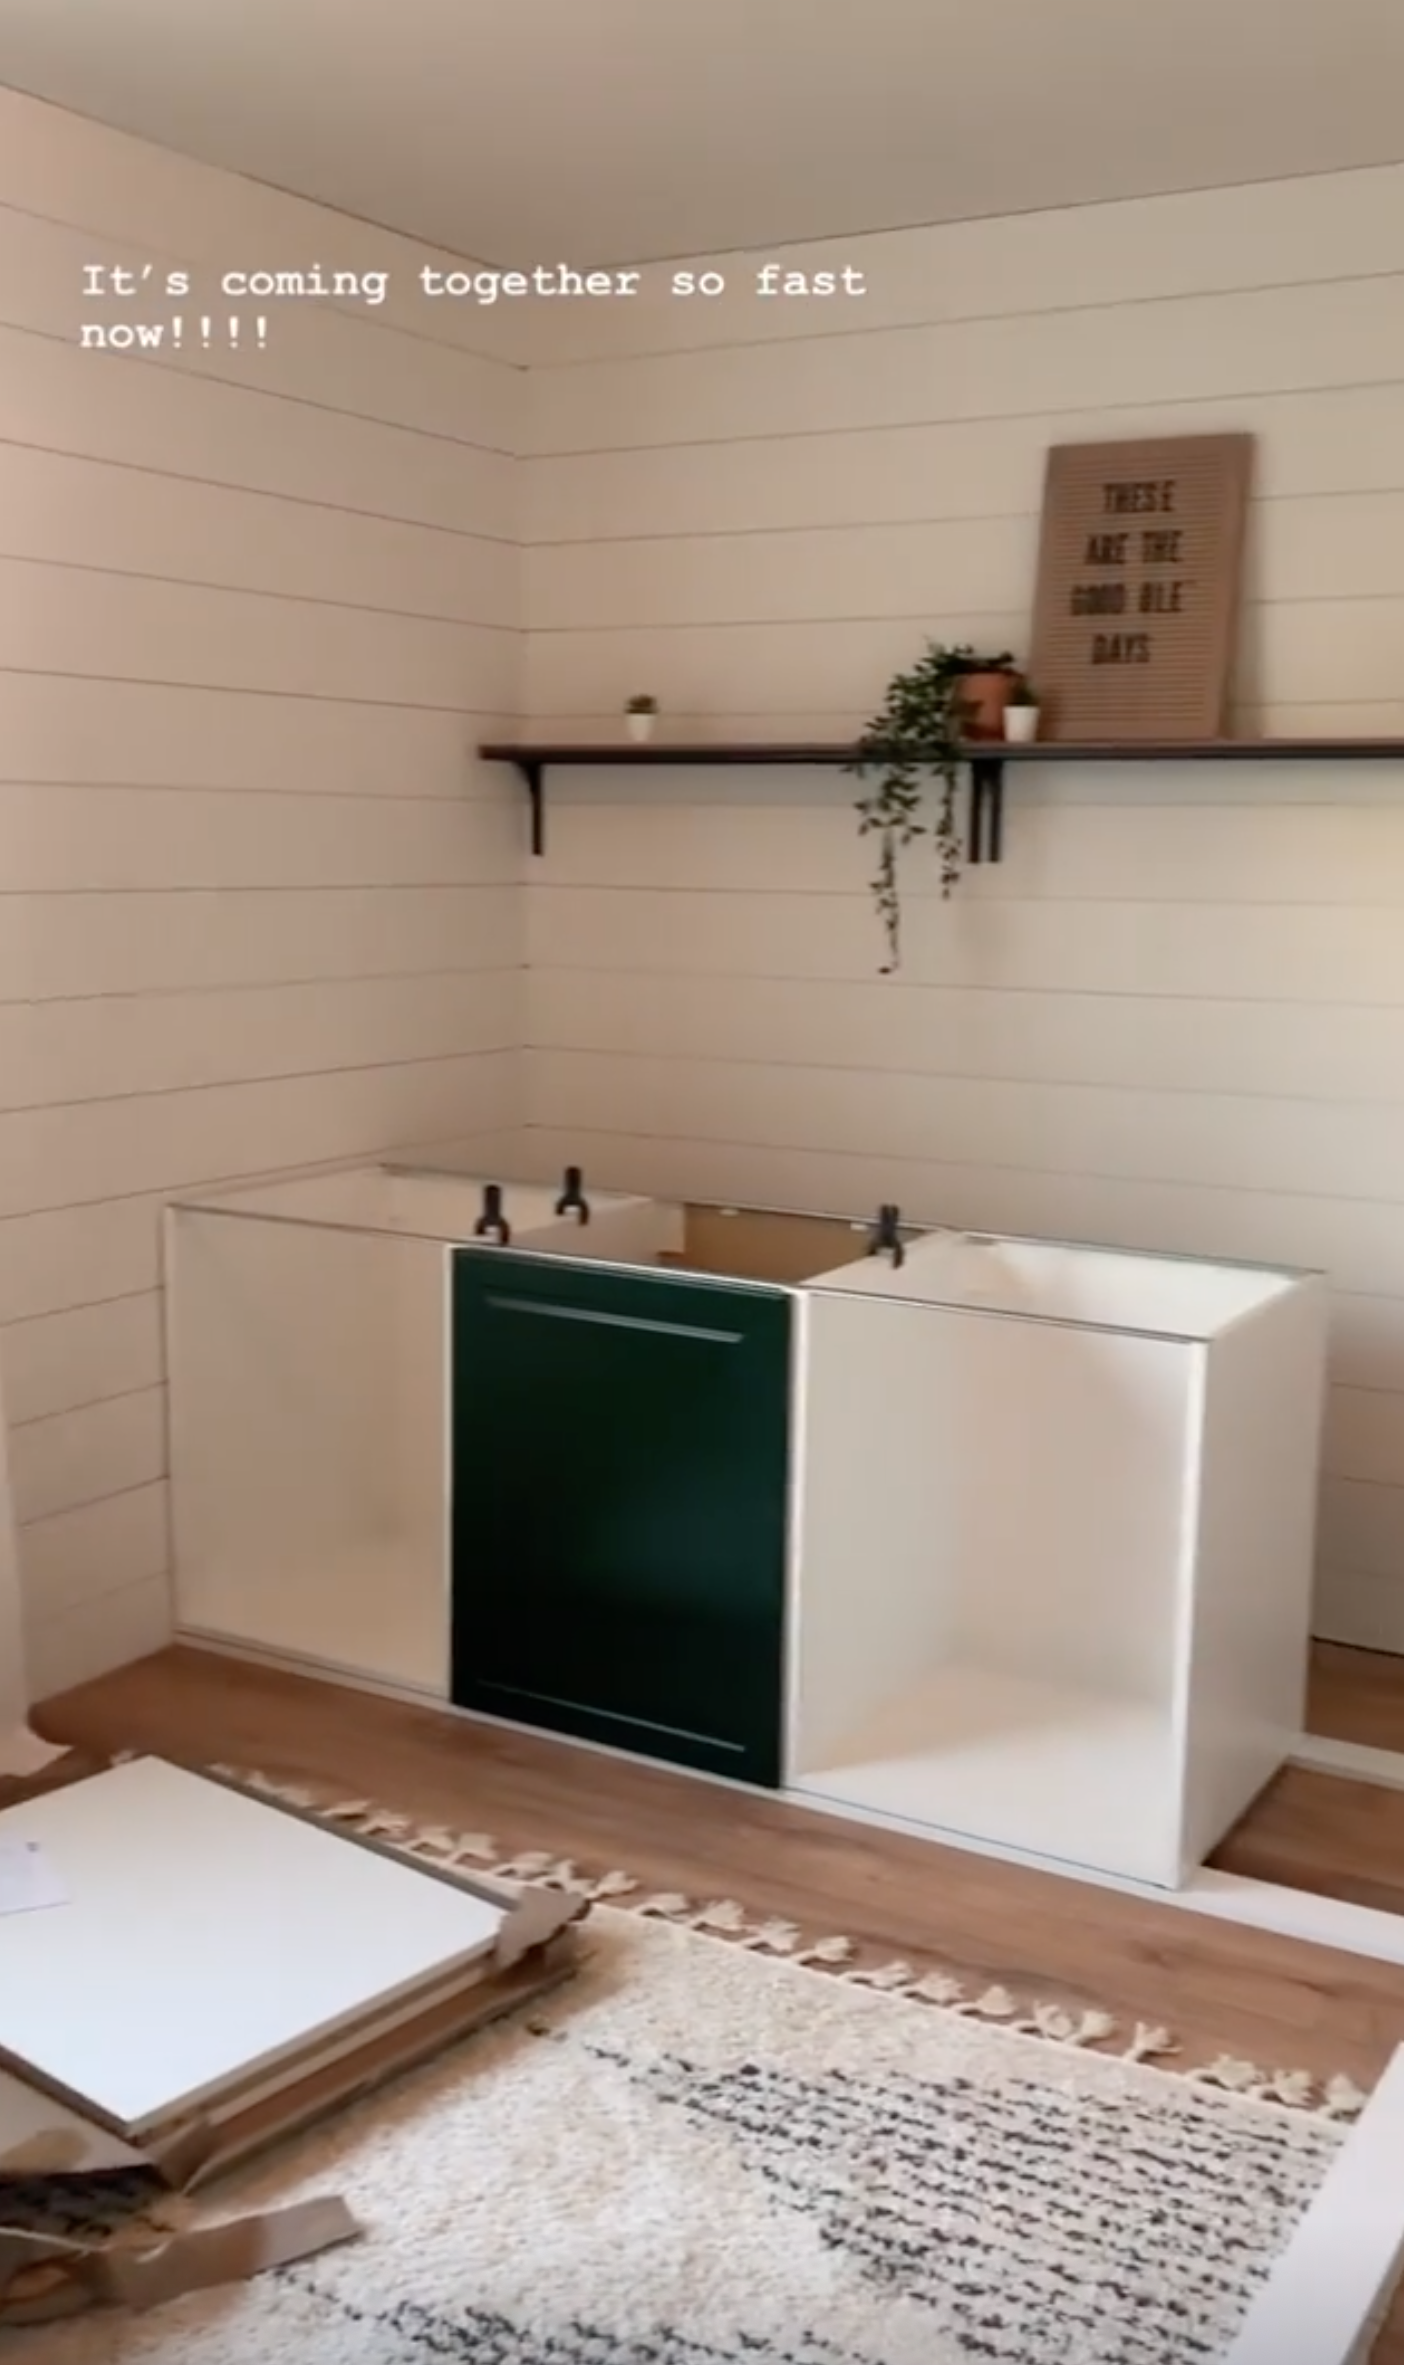
So the fun part: these are kitchen cabinets from Ikea. Please know that to get the cabinets you have to go in to a local store. You also have to work with a kitchen “expert” where they build the kitchen for you in their archaic 3d modeling software. When you get there sign up right away to get help so you aren’t left waiting. Allot at least a few hours to this process. Also make sure you come with exact dimensions. Also LET THEM SHIP THE ITEMS TO YOU. We thought we could drive some home. We could not. Not only were they too large they were also too heavy. it costs a flat fee to ship everything so just let them ship all of it. It’s completely worth it and only took 24-48 hours for us to receive our items.
These cabinets are the large SEKTION/MAXIMERA Bodbyn Green base cabinets. We attached them to a 1/2” thick primed trim piece. We did NOT get them with the toe kick so we had to lift them a tiny bit off the ground so the drawers and doors would open over the rug. There are a lot of different styles, but you can customize them completely in the 3d modeling software at the store (including removing drawers and toe kicks).
The tabletop is the KARLBY countertop. The island depth size is the far wall desk and the smaller computer desk is just the standard depth. We were able to cut these using the festool. The remnant from the second counter depth desktop ended up being the perfect size for the Glowforge table.
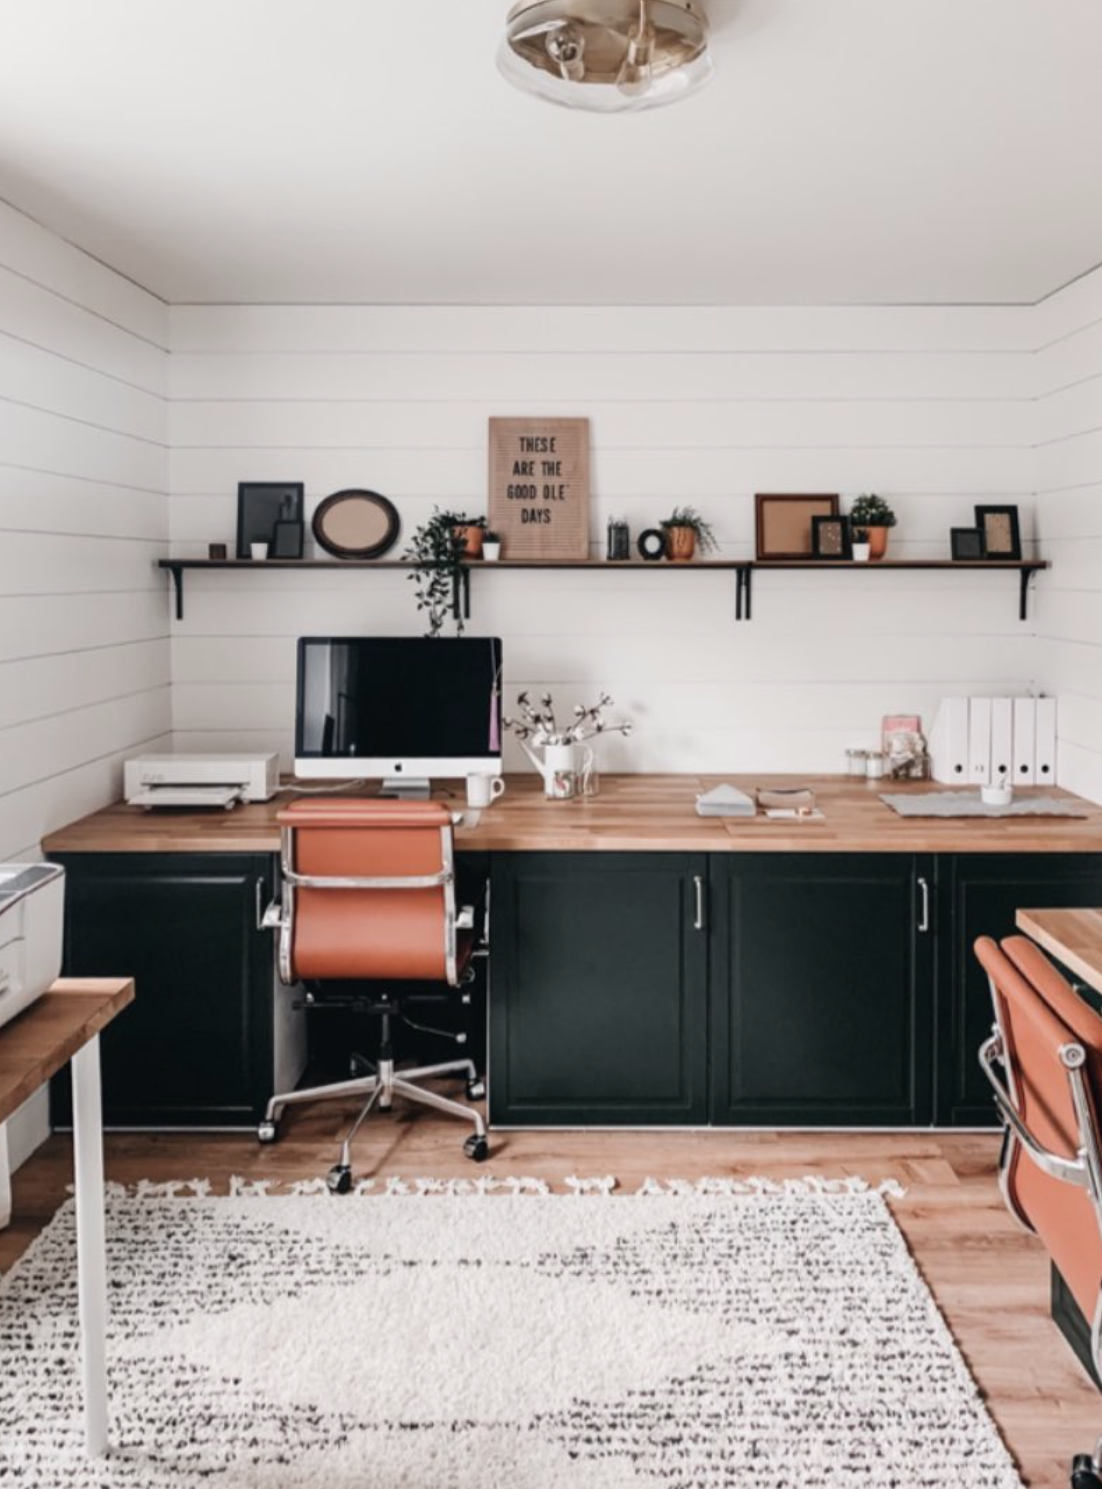
Shelves are FJALLBO from Ikea and they are really fun in person. The frames are an assortment of frames my mom gifted to me as she was cleaning out her house. The plants and plant pots are all from Ikea as well. The large wood letter board sign is Hearth and Hand with Magnolia at Target. Chairs are Laura Davidson Soho Soft Pad Management Chairs from Amazon.